Being Careful With Beauty Products

Image

All I wanted was a basic facial cleanser and moisturizer. I stood in Sephora for probably an hour, comparing foaming cleansers to oil cleansers and debating between gel or lotion moisturizers. For some time, I had been using Sephora’s branded skincare line and while it kept my face moisturized I was really wanting something more. I had started reusing some leftover Ole Henriksen products I had from last year and was really happy with the outcome, but sadly Sephora didn’t have them in stock. Since I work outside in the elements and jet fuel emissions I needed something ASAP. I decided on Philsophy’s Purity Made Simple cleanser and their cult-favorite Hope in a Jar. Shortly after using them for the first time on Sunday morning, I broke out into a mass of hives. I had a horrible bumpy, itchy, and scaly red rash all over my face and neck and even parts of my body that I had touched while getting dressed.

Most of the hives are gone now, but I still have some rash on my forehead and cheeks that I’m worried might scar. From what i’ve read, this rash could stick around for another few weeks. Great, fantastic, WONDERFUL. But, this isn’t so much a story about a product that didn’t work out for me. This is more of a story about how I was an idiot and didn’t do things properly that could have avoided this whole hives episode.

I usually see it on the instructions of hair dye, but you should always try new skincare or cosmetics on the back of your hand or your forearm instead of just slathering it on your face. I’m pretty positive it was the moisturizer that cause the hives, since I’ve used Purity Made Simple in the past with no problems. I have even sampled it on my arm in two places before I decided to purchase it. In one area, I had two small bumps that resembled tiny ingrown hairs and on the other spot I had nothing happen. I didn’t even notice the two tiny bumps until I was trying to figure out what had caused the reaction.

I don’t have sensitive skin or allergies so I’ve never worried about having reactions before. Now I’m mildly terrified of breaking out again. I’ve let my skin rest all week, only washing it with Cetaphil. When I returned the Philsophy products I was sort of scared to buy any skincare even if it was meant sensitive skin. In the end, I purchased to the Ole Henriksen products I should have bought in the first place. I’ve used them before and was happy with the results I got the second time I used them. I did do spot tests on the inside of my arm the night before I started using them and thankfully, no hives.

But take care next time you’re looking at new skincare or cosmetics. Let my itch and rash be a cautionary tale for everyone.

The Cystic Acne Toolkit

I’ve mentioned having to deal with cystic acne before. However, I’m dealing with it much more effectively after much trial and error. My medicine cabinet looks like graveyard for Sephora products before I finally starting honing in on products that work. Finding products that work for adult acne is somewhat difficult. While pursuing the skincare section at Ulta not too long ago, I had the following conversation with an employee:

Uber-Chipper Ulta Employee: Have you tried salicylic acid acne products? They’re really effective for treating hormonal acne.
Me: I’ve been dealing with acne for 18 years. Salicylic acid has never worked for me.
UCUE: Are you sure? It’s the most popular treatment for acne.
Me: If that crap worked for me, I wouldn’t be standing here looking for something else.

After probably three years worth of research, I’ve put together the following toolkit to help keep my giant red inflamed pimples at bay:

acne1. Mario Basescu Buffering lotion, $18 | 2. St. Ives Blemish Control scrub, $4
3. Sephora Lance/blemish extractor, $18 | 4. Sephora Three-in-One Blemish extractor, $22
5. Queen Helene Mint Julep Mask, $4 | 6. Olay Pro-X Facial Brush, $28

  1. Mario Badescu’s Buffering Lotion is the best pimple drying lotion I’ve ever used. The first time I used it, I had an enormous pimple that was the size of a pencil eraser under my left eye. I could look down and see it. I tried to pop it a few times with no luck. In desperation, I went to Ulta and just wandered around for probably two hours researching before I ended up in front of the Mario Badescu display. After reading the label, I squirted some out of the tester bottle onto a cotton ball, held it said giant pimple for about 15 minutes and left. The next morning, the pimple had gone down probably 75 percent. It was gone by three days later and didn’t scar. I went back to Ulta and bought a bottle. If you’re at wit’s end trying to treat stubborn pimples, try this lotion.
  2. For me, exfoliation is key to helping control acne. My cystic acne is hormonal, but I get smaller pimples when I’m not staying on top of exfoliating. This St. Ives scrub does have salicylic acid in it, but I like the texture of the scrub when I really need a deep clean.
  3. When my pimples hit a certain size, they get a giant white head and I get antsy by trying to be a good girl and not pop them with my fingers. With this lance, I can gently touch the pustule, let it start to drain, and then use the extractor end to press most of the gunk out.
  4. I don’t have this particular model of extractor, but I have a similar one. This model has a flattened wire extractor at one end, with a sturdy wire loop at the other end. I use this model on my smaller pimples and blackheads.
  5. In the summer when my skin gets super oily and congested, I use this Mint Julep mask to help control oil and help battle sweat-induced pimples. Sometimes it helps with the cystic pimples, sometimes it doesn’t.
  6. The Olay Pro-X brush, next to the Mario Badescu lotion, has been the most effective in helping to keep any acne at bay. Again, most cystic acne is hormonal, but exfoliation can help keep them from getting any bigger or worse, double-decking. A double-decker pimple is what I call a pimple with two heads, or two pimples touching. This is gross, but I noticed with my double-deckers that if you popped one head, pus and liquid would gush out, but the other head would pop out dirt and debris. I’m guessing when the one pimple forms, it becomes much easier for nearby pores to get clogged quickly.

If you have any helpful tips, products, etc., please feel free to share in the comments!


How to Dress for Winter Sorority Recruitment (Rush)

rush_headerLast fall, I gave advice on what to wear through fall sorority recruitment, which used to be known as rush back in the day. When I set out to make my boards for this post, I had to really think about what’s appropriate and attractive and wouldn’t cause frostbite. A lot of outfits I put together I’d later deem frumpy, which is easily done in winter. Even though every college is different, most schools who conduct recruitment in the Spring semester are less formal than Fall rushes. This allows for some breathing room so you probably don’t have to run out and buy an entirely new wardrobe. The women in the houses are going to know it’s only 15 degrees outside, they’re not going to expect you in a sundress.

A bit of a rant: I’ve been reading a few blogs run by other 20-something women who are also giving advice on what to wear through recruitment. However, these women were not members of a sorority. I’m pretty sure they mean well (or at least I hope they mean well), but I find it utterly wrong to give advice on something you don’t know.

sweaterspants

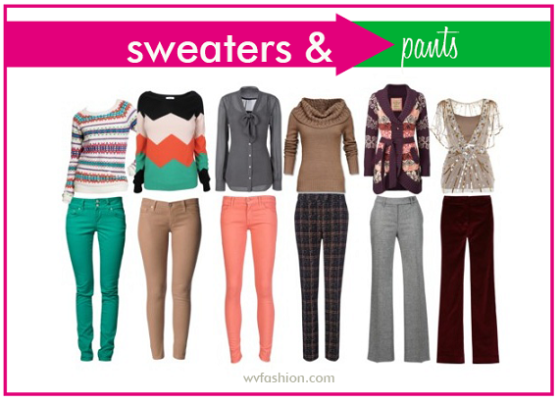
I’m going to be blunt: DO NOT wear dark jeans, a sweater, flat boots, and a black peacoat. You’re going to blend in with all the other women going through recruitment. It’s like wearing a Lilly Pulitzer sundress through Fall recruitment, everyone else is wearing the same thing. The left side of this board shows more casual outfits, while the three outfits on the right are for dressier recruitment events. Your recruitment counselor will be able to give you a breakdown on what to wear each day.
What to take from this board: Don’t be afraid of color! Color will help you stand out. Patterns such as the tweed pants are also great attention grabbers. Luxe fabrics like velvet or herringbone are also eye-grabbers. A little bit of sparkle can also go a long way.

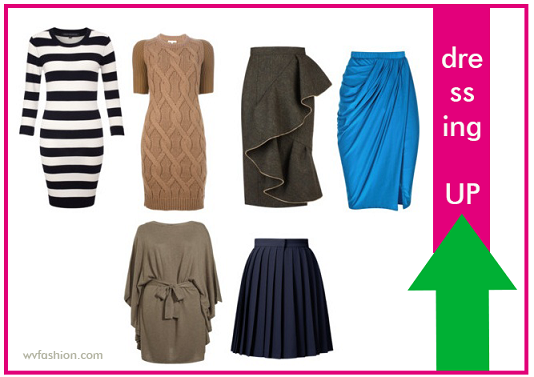
skirtsYou can still wear skirts and dresses, just be sure to wear tights. As a general rule, match your tights to either your skirt or your shoes to add the illusion of a longer leg. The skirts I put on this board have a lot of memorable detail, and the dresses have a lot going on for them. Each of these dresses is a knockout, and would great in your wardrobe even if you’re not in college. The black and white dress is very graphic and could be accessorized in so many ways. The cable knit dress has lots of texture, and the gray dolman dress has the most amazing shape. This is the second time I’ve featured this dress and I’m hoping it goes on sale soon so I can snag it.

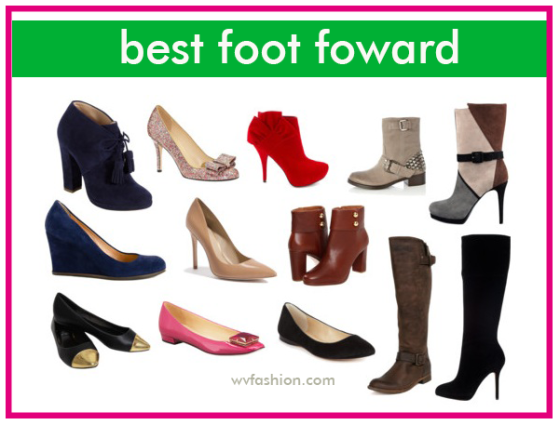
shoesusethisOk, I said to avoid flat boots, but I put them on here anyways because they may have to be an option. If there’s snow and ice on the ground, I would choose safety over style and would reach for them myself. But avoid them if you can. When choosing shoes, think about the weather before you think about the outfit. I’m a huge stickler for safety and I don’t want you to get hurt because running around in heels in an ice storm is a really bad move. If it’s just going to be cold, you should be able to get away with any shoe, so long as it’s not sandals.
Hint: carry a travel size package of baby wipes to wipe salt off your shoes. You can also buy leather wipes to wipe salt off leather shoes.

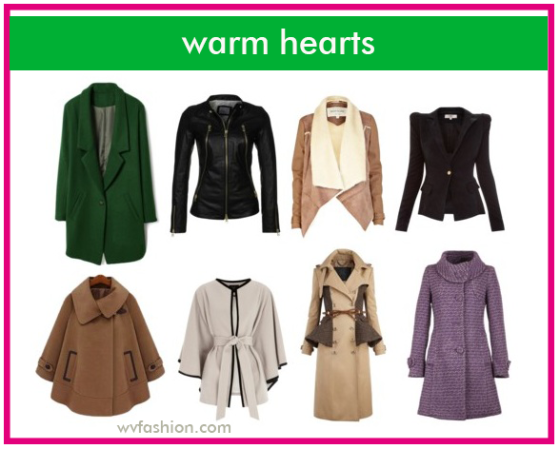
jacketsCoats are a tricky thing when it comes to winter recruitment. Some houses may have coat racks, others you may be holding if not still wearing your coat. This is the reason I’m telling you to avoid black peacoats. Each one of these has stand-out details, but a brightly colored peacoat from Old Navy work just as well. Make sure to have your coat cleaned before recruitment, or at least try to take a Shout wipe to your dirty white puffy coat. A dirty coat = huge no-no. If a friend has a great looking coat, ask if you may borrow it. Your local vintage/thrift/consignment shop may also have some amazing coats so give those a try. Are you stuck with your black/brown/navy peacoat? Make sure your accessories are top-notch.

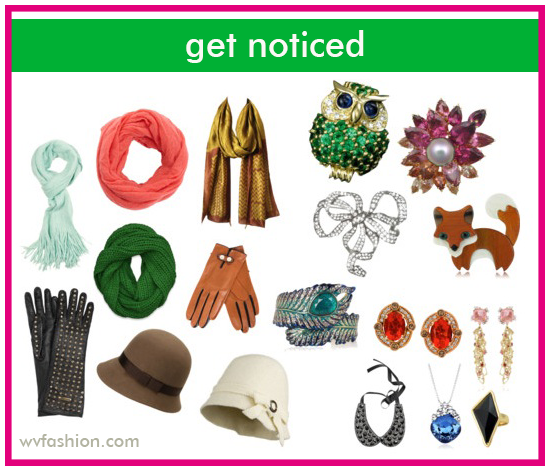
acessoriesLike any other recruitment, my advice is always find an accessory to help you stand out. It could be a brightly colored scarf, detailed gloves, or a great hat. My biggest recommendation is find knock-out jewelry. Sparkly and colorful earrings will really help you stand out (they’re going to be looking at your face), or a collar necklace. Another suggestion? A brooch. You can pin this on your coat, but can take it off in a blink and pin it to your clothes. Your grandmother probably has some you could borrow or you can buy one at any Goodwill for a song.

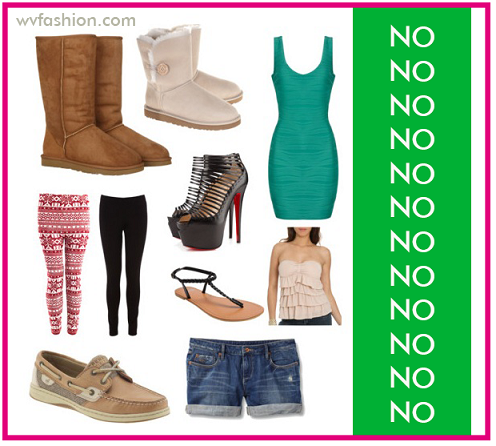
And as always, a list of what you should not wear:

nonosClockwise from the Uggs:

  • Uggs: EVERYBODY is going to be wearing them. Your goal is to stand out, not blend in
  • Uggs with a button: No Uggs in any style, shape, form, or material
  • Body conscious dress: Bodycon is best left to the club, not sorority recruitment. If you would wear it to the club, don’t wear it to sorority recruitment
  • Tube top: Tube tops and/or anything strapless shouldn’t be worn. It gives the impression you don’t know how to dress for occasions, which is one of those things sororities are picky about
  • Shorts: I shouldn’t have to explain this. It’s just too cold to wear them
  • Sandals: Again, not season appropriate
  • Stilettos: Again, best left for the club and not recruitment
  • Boatshoes: You could probably get away with these at very casual rush events, but unless they’re clean avoid them. Wear flats instead.
  • Leggings: No. Just no. Even for a very casual recruitment, step up your style game a notch. Even if all the sorority sisters in the house are wearing leggings to watch The Bachelor and eat ice cream remember you’re a guest, not a sister.

When it comes to hair and makeup, again look at the weather. In the winter, my hair turns static-y and limp even with the best of products, so I’d probably wear my hair up. I’d also take care to exfoliate and moisturize so my skin doesn’t look flaky. Don’t forget to wear blush/bronzer and lipstick. A lot of people get really pasty in the winter, and a little color will go a long way. Notice I said lipstick, not lipgloss. It looks really weird to be running around with super shiny lips in the winter, it’s like inviting chapped lips. This is also not the time to try the latest in hair styles/make up looks/nail art from Pinterest.

At the end of the day, don’t forget to be yourself. The best wardrobe will rarely cover up the complete lack of personality.

pinterest-logo

Spend or Save: Colorblock Shirtdresses

Polyvore set here.
Left, BCBG by Max Azaria, $148, Nordstorm
Right, Alloy, $40, Alloy.com

Colorblocking and shirtdresses are both still trendy for this fall.  Luckily, they can be found at all price points, as these two dresses indicate.  While there are a lot of differences in these two dresses, the style statement is similar enough to debate if spending money is sometimes better than saving.

The blue dress on the left is made of silk and I’m iffy on the tie belt.  The violet dress is made of a questionable polyester but the gold skinny belt adds so much to the dress.  I think both are equally flattering, and despite my questions on the quality of the violet dress’s material, it drapes very well.

Should you spend or save?  It depends on what you’re buying a dress for.  If you’re looking for a work dress, the blue silk without question.  Silk does need more care than polyester, but with proper care it will look like new for years.  Without seeing the Alloy dress up close, it’s hard to determine how well the polyester is made.  It looks pretty cheap in the picture, but the draping is really on point.  My general rule on polyester is much like the UK basketball team, polyester is one and done.  Meaning, you get one year of wear and then it’s time to toss out or give away.  Keeping that in mind, if you’re looking for a fun addition to your wardrobe, the violet dress suits your needs perfectly without having to spend a lot of cash.

What to Wear to Sorority Recruitment

One of the blogs I follow is Great Lakes Prep, which covers preppy fashion and life in the Midwest.  Nick, the grand pubah of the blog, wrote a fantastic piece on how young gentlemen should dress for fraternity recruitment. I decided to follow his lead and advise what young ladies should wear through recruitment.  Yes, it used to be called Rush, but that’s considered a dirty word now due to “political incorrectness” or something like that.

Warning: This post is going to be harsh.  As shallow as it sounds, you will be partly judged on your appearance and I’m not going to sugarcoat the fact.  You will have a better chance into getting into the sorority of your dreams by wearing last year’s well-fitting clothes from Target than a too tight dress with stripper heels fresh from the Gucci boutique.  Sororities, at first appearance, are old-fashioned entities.  While the sorority members may dressed like hookers, dressing like you’re accompanying your grandma to a church tea social will win you points in recruitment.

Recruitment is a week-long process, and most schools follow the model I’ll describe below.  Most schools also now will tell you what you need to wear, this is just a visual to help guide you.

Typically when you register for recruitment, you’ll get a tee to wear for the open house round (I used WVU tees as stand-ins).  This round is where you go to all the sorority houses (or rooms if they don’t have houses), and meet the sisters.  With the tees you’ll usually get the option of wearing shorts or jeans with it.  I pulled some examples here to show you what you need to look for.  Make sure your jeans aren’t hole-y or overly distressed, make sure they fit, no muffin tops, and no coin slots or whale tails showing.  If you opt for shorts, repeat after me: NO BOOTY SHORTS.  The inseam should be as long as your middle finger.  If your shorts don’t cover any cellulite you may have, they’re too short.  Wear shoes that are cute and comfortable and consider investing in some runner’s block, which is a waxy substance that runners use to avoid blisters on their feet.  Don’t try to wear heels.  You’re going to be spending most of the night on your feet and heels will just make your feet ache.

For jewelry, makeup, and hair, keep it simple and something you’re comfortable with.  Now is not the time to try a sock bun or a smokey eye.  Make sure you give yourself a mani/pedi.  You can have some fun with your polish colors and a mani in your school colors would be a great choice.  However if you’re going to use more than one color, make sure it doesn’t match any of the groups’ colors, as that tends weird them out (it reeks of desperation).

After the open house rounds you start to narrow the sororities down to ones you like, and the sororities do the same.  This is the round where schools vary the most and they’ll let you know what you need to wear.  Some schools will have a philanthropy night, and for example, you make help the sisters make cards for a local hospital unit.  Others may have presentations that go more in-depth in the group’s history, philanthropy, etc.  If you’re going the craft route, you’ll wear something similar to that of the open house round.  If you’re in the presentation route, you’ll want something dressier.  A sundress is perfect for this round, but a nice pair or pants or capris–no denim allowed–will work, too.  I don’t recommend wearing strapless dresses for this round, as I said earlier, sororities tend to skew old-fashioned during recruitment.  Wear cute sandals or flats while avoiding heels.  You can be a bit more daring with your makeup/hair/nails in this round but as I said earlier, don’t try new things.  If you try something new you may not be on your best foot and that is exactly where you want to be during recruitment.

After the invitational rounds comes Preference, or more commonly known as pref night.  This is where the sororities make their last impression on you and why you should join their house.  This is typically an emotional night for the sororities, and you may cry along, too.  This is a dressy occasion, which again means no jeans or khakis.  A lot of schools require black dresses for this night, but others will let you wear another dress of choice. Strapless dresses are okay for this night.  These are clothes you would wear to a fancy dinner party, a simple cotton dress from J. Crew isn’t really recommended.  You can wear heels this night, but keep them under 3″ high and don’t wear your everyday black flats.  Tasteful jewelry and makeup is your best bet.

And now here’s a pictorial of what not to wear:

1. NO BOOTY SHORTS.  Booty shorts make you look cheap, and sororities don’t want cheap-looking members.

2. Avoid jeans with any rips, holes, or major distressing.  Now is not the time to scream your love of Hollister.

3. The heels on these shoes are simply way too high.

4. This dress is just too much.  If you’d wear it to a club, you should not wear it to a sorority function.

5. No rubber flip-flops.  Leather ones like Rainbows are fine, but leave the rubber for the beach or pool.

6. Avoid old trends like Ed Hardy, Von Dutch, sublimation prints, those crinkly blouses from Fashion Bug, or anything the cast of the Jersey Shore would wear.

7. This dress would be a fantastic pick for a sorority formal, it’s too formal for recruitment.

How to Not Dress For Work

I’m a member of an organization called The Levo League.  To describe it rather quickly, it’s a networking organization for women by women.  There are job postings, mentors you can actually talk to, and all sorts of other stuff to help young women develop their careers.  Personally, I’m not sure why I joined, seeing as most of the advice/discussion/etc., tends to lean towards positions within marketing/advertising/blogging in big cities  and I’m in the landscaping/construction business in West Virginia.  Maybe one day it’ll come in handy, anywho.

The Levo League also likes to discuss fashion, mostly work-related.  While surfing around Facebook today, they posted the following picture with a link to a guest blog post:

(photo source)

I don’t know why the League chose to use this picture, as it’s not used anywhere in the post.  But since the Levo League is about women helping women, let me give some advice as someone who has been a hiring manager:

  • I hired for landscape designers and apartment managers, both positions that were required to deal with clients.  My company did have a dress code which wasn’t too picky but the designers had leeway with their dress code and the apartment managers had to dress business casual.
  • Had anyone shown up to an interview dressed like this, I would ask them “Why should I hire you to represent this company professionally when you don’t seem to have a grasp of how a professional should present themself?”
  • Even though most of the landscape designers wore jeans and tees, I would have sent anyone home to change  if they came in dressed like the woman does in this picture.  Again, it’s simply not professional, and I wouldn’t want that person representing my business.

Had the blouse in question been just a plain pink blouse, I would be okay with the outfit.  Okay, so I really hate the skirt, but the outfit would have been appropriate for either of the positions.  I simply don’t think the blouse is appropriate for work, period.

I always like to error on the side of caution and professionalism.  Even when I was in college and was applying for a job as a waitress, I showed up to the interview in a suit, well-groomed.  I also started out making more money per hour than the other waitresses hired at that time with similar experience.

You don’t have to spend lots of money on clothes to wear to work or an interview, but make sure that they’re appropriate for your position.  Even if I was hiring for a social media consultant in New York City (my dad’s hometown), I would question the person who came in dressed like Minnie Mouse.

How to Achieve Great Eyebrows

Earlier, I showed you some of the ways eyebrows can go wrong, so now I’ll tell you both the easy and the not-quite-so-easy-way to achieve perfect eyebrows.

The easy way: have your brows waxed.  This will cost you anywhere between $10-20 per session.  My advice to you is to have your hairdresser or someone else at the salon that you’d trust your life with.  When I used to wax my brows on a regular basis, I once walked into a salon and had someone I didn’t know wax them, and not only did the woman wax them too thin, I had a mass of ingrown hairs.  It took roughly six months to grow them back in correctly and get rid of the ingrowns.  Also make sure to have the same person do your brows time after time, it will cut back on mishaps.

The Sort-of-Easy-Way (Also known as the MF way): This is how I currently take care of my brows.  I used to have them waxed every two weeks, due to the fact my hair grows back in super fast.  After a while, I went through a major budgeting period where I cut back to having brows done every two months.  I would pluck the hairs, but since there were so many it’d take the better part of an evening just to get everything done.  This is when I discovered these little babies:

Noxema Eyebrow Shapers, $3, Dollar General Stores and some drugstores

These save me so much time.  I use them between my eyebrows and to shape the rest of my brows.  The only part I now pluck is that tricky little spot under the browbone in the corner of my eye next to my nose.  Accept no substitutes on these; I’ve tried other eyebrow shapers that didn’t work anywhere as wonderfully as these do.

Personally, I find the effects from using the shapers to last almost as long as a wax.  I might get an additional 2-3 days out of a wax, but since using the shapers is so quick, cheap, and easy I just stick with them.  As a warning, the shapers can take too much off if you’re not careful.

If you have to grow your brows back in:

It’s not going to be pretty, but it’ll be worth it.  Put the tweezers away, stay away from the strips at the salon.  If you already like the shape your brows are in, just let the hair grow back in, only plucking the hair between your brows and under the brow bone.

To fake eyebrows in the meantime use a brow pencil (I like ybf beauty’s Automatic Pencil in Taupe.  Looks good on everyone, I swear) and make short little strokes, like you’re drawing individual little hairs.  Next, take a little bit of face powder and apply to your pencil marks, and then go over the marks and your brows with a clear mascara or brow gel.  When you’ve grown in enough brow make sure to mark where you want the plucking to stop so you don’t go overboard.

Not sure where exactly to start?  

This picture of the gorgeous Ms. Elizabeth Taylor is one of the best I’ve ever seen on the subject of eyebrows.  They’re so perfect, it’s slightly sickening.  This picture is also an easy way of giving a quick idea of how to shape your brows.

1 & 2: Your brows should start and end at the same place where your eyes start and end.  If you use a pencil,
put it against your nose (where I have the lines drawn) to learn where your brows should extend.
3. There should be NO hairs below the brow bone.

The height and arch should be dictated by your natural brow structure.  Some people will have a natural, classic arch while others will angle.  Go with what you naturally have and clean up as desired for the best look.

Trust me, when you realize how great your eyebrows make your face look, it will become a priority.

How To Schlump Correctly

I always consider the Thanksgiving-Christmas season the busiest of the year.  There’s just so much going go, what with the shopping for food and presents, millions parties to attend, church events, and dragging your sick rear to the doctor.  During the holiday season–and any season, really–there are going to be times when you’re going to schlump.  I’m not sure of the origin of the word “schlump” but my mom has always used it to describe being in public and not having taken the time to properly dress yourself.  To me, schlumping is when I have to run out to the grocery store for a few quick things or am visiting the doctor and don’t feel like putting on my face at the time. 

I now present to proper way to schlump:

This outfit probably looks very familiar to you, as it’s the basic weekend uniform for many women.  I know I’m in a very small minority of fashion blog who says this is acceptable but I like to be realistic about what you actually wear in real life.  I know very few if any people in West Virginia who spend their weekends gallivanting around in couture Dior.  The key to  looking good while schlumping is making sure that the clothes are clean and in good condition. I started with a base of basic black yoga pants and a simple t-shirt.  I added a fitted sweatshirt to keep bulk down and tossed in a Vera Bradley wristlet so you don’t have to tote your handbag around.  This wristlet has room for cash, cards, a pen, gloss, and a cell phone.  The only thing that doesn’t fit is my checkbook, but I don’t carry mine too much. 

The most awesome gold shoes are the Nike Air Rifts.  I own these shoes, and they’re showstoppers.  They’re a hybrid of running shoes and barefoot running shoes (the funky shoes that show off all your toes).  There’s a space for your big toe, and all the others go in a separate compartment.  Nike does sell special socks to wear with the Rifts, but I just use my regular socks, it’s similar to wearing flip-flops in a shoe form.  To tie the outfit together I chose a simple gold pendant and some ponytail holders with little gold charms. 

The black bottle is one of the most important items in this set: Tresseme’s dry shampoo.  Dry shampoo is great for those days when you wake up late or you just don’t like the way your hair looks.  Dry shampoo is pretty simple to use, just spray a little bit on your roots and brush it through your hair.  If you want to look a little bit better, spray your roots and the sides of your hair and blow it out with a round brush for about 30 seconds and toss up in a ponytail.  A lot of people will try to get by with a baseball cap, but that just screams “I’m too lazy to do my hair.” 

Some more pointers:
-Absolutely NO printed PJ pants.  One of the biggest fashion travesties I see on a daily basis are women who will do their hair and spackle an inch of makeup on their face but are wearing ridiculous PJ pants.  I mean, really?  This problem can be corrected 100% of time by just putting on a pair of jeans.  If you’re able to take the time to make sure you’re using five shades of eyeshadow, why can’t you take 15 seconds to put on a pair of pants?
-You don’t have to match.  You don’t have to run out and buy a matching Adidas sweatsuit, again it’s just a simple matter of the clothes being clean and in good shape.
-Pay attention to fit and avoid anything too baggy. 
-Go easy on the Vicky Secret’s PINK sweats.  If you’re over 30 it’s time to limit yourself to one Pink piece at a time.  You look like you’re trying too hard if you’re wearing head-to-toe Pink.
-You don’t have to wear makeup while schlumping.  Actually, I think it takes away from the look if you have a full face of makeup on.  My next thought is if you have enough time to do foundation and eyeshadow blending, just go ahead and put some jeans on.

Even when done correctly, schlumping should be kept to a minimum.  By my standards, if you have enough time to put on the above outfit, you also have enough time to put on jeans and a sweater.  However, there are times when comfort is key, and an outfit similar to this will help you look and feel good.

Ask the MFer: How to Cover Pudge

Four months into this blog, and I finally get my first email asking for help!  Yay! 

What’s a good way to cover tummy “pudge?”  I’m a secretary in an office and the dress code is business casual.

Love your blog!

-BB

Thanks for reading, BB!  Just as general reminder, business casual can mean different things for different offices, so be sure to double check your office’s dress code.

Basically, there are two things that I think will do the most camouflaging to stomach pudge:

I know this suggestion will be unpopular to some, but mid or high rise pants are the way to go for the maximum pudge concealment.  I don’t get why West Virginian women–no matter the size–refuse to buy anything but lowrise pants.  A higher pant rise will help you keep the pudge tucked in and out of sight.  On top of the rise, look for a boot cut with a slim thigh.  You’ll probably have to look a bit longer to find them, but the slimming effect can’t be beat.  If you can’t find them, a local tailor should be able to help you out. Also, avoid patch pockets (like those on jeans) or back flap pockets, those ruin the sleek look of the pants.  The bootcut helps balance out your middle. 

A quick list of no-no’s when it comes to pudge-concealing pants:
-NO low rise
-NO patch pockets or flaps on back pockets
-NO flares (generally, leg openings over 20″)
-NO skinny pants (unprofessional)
-NO tapered pants.  EVER.
-NO polyester pants.
-Go easy on stretch.  After a while  the pants won’t help keep stuff tucked in.

Long shirts are amongst your best ally in the battle against pudge.  Tunics are great, like the gray one on the top left hand corner.  The belt is also a nice addition because if you tie it at the narrowest part of your waist, it makes your waist look smaller while the draping helps conceal.  I use the baseball shirt in the top middle as more of an example of a hemline to look for than as an actual top to wear (although wear it with the white pants from above and then add a belt would be a great summer look).   Shirttale hems are wonderful at hiding figure flaws, which is why I added the basic beige button down next to it.  The beige shirts is also made out of silk, while expensive, is well worth the money.  Silk lasts forever, wears like iron, and can drape and conceal like nothing else.  The pink shirt on the bottom is darling, but I think it needs a belt as well or else it leans into the “cut off mumu” look a bit too much for comfort.  I added the cardigan because even if it’s 98 degrees outside with 100% humidity, your office will be a chilling 55 degrees. 

When it comes to shirts, avoid shirts that hit above your hip, as that line draws the eye right to the area you’re trying to hide.  Also, avoid the boxy jackets and blazers that seem to be everywhere nowadays, as those don’t do a damn thing to help you.

Being Realistic About Fashion in WV

You’ll probably notice throughout my blog where I may mention the plus size selection.  Very few fashion bloggers will even discuss plus size fashion unless they’re specifically plus-size bloggers.  Yes, many West Virginians are overweight and obese.  In fact, my hometown of Huntington was declared the “Fattest City in America” a few years back, and Jamie Oliver came and filmed his Food Revolution TV series here.  I really don’t know anything about science so it’s hard to say why so many West Virginians are overweight and quite honestly, it’s none of my business.  If you don’t like my coverage of plus size fashion, go start your own damn fashion blog. 

Also of note:
On a regular basis, I refer to Fashion Bug as “Fashion Ugh.”  I don’t have much kinder words for Deb.  I do realize that for many people in West Virginia, those are among their options.  And to be fair, I have found and purchased cute things from both stores in the past, including these adorable nude heels I found earlier this year.  Since many people in the Mountain State don’t like to shop online, I may on occasion have to cover these stores because both can be found in a fair majority of towns in the state.  Again, if you don’t like it, go start your own blog. 

I am trying to be inclusive to all West Virginians in the blog.  Use the high fashion for inspiration or laughs.  Learn where to buy something similar that won’t cost you a firstborn child.