WV Fashion is now at WVStyle.com!

So, I had all these grand plans of moving this site over from WordPress onto Blogger. I started the process and ended up majorly messing some things up. In the meantime, head over to WVStyle.com to continue reading the most current posts from this blog. WVFashion.com will return as soon as soon as I figured out what I did…

visit WVStyle.com now!

Organizing the Nail Polish Mess

mASThEAD

Lawdy, I’m addicted to nail polish. In one weekend alone, I managed to blow my entire beauty budget for the month on only nail polish.
It’s not my fault.
Sephora put its entire OPI line on sale for $4.50.
I bought this beauty from Julep for only $35 during their Friends & Family sale.

I do like to clean everything out, like my closet and makeup bins, a few times a year. However I just hadn’t gotten around to going through my nail polish for a long time, I’m think it’s been at least a year. The picture above is actually what my polish bin looked like before I got started on this weekend’s clean-out project. This is not the way to store polish and I’m ashamed of myself.  It was well beyond time to clean out.

To start off, I separate all polishes by age. If it’s over a year old, it goes to the left. If it’s been within the past year, it goes to the right.

OldPolishesMH
Just because a polish is over a year old doesn’t mean it’s going away.

Same for the newer polishes, just because you may be new doesn’t mean you get an automatic in.

NewerPolishesMHThe reason I separate them by age is to help weed out the deadwood quicker. Amongst the older polishes are those that have dried up, separated, and have started to go bad. It also helps make it easier for me to determine what polishes I haven’t used in a long time. Going through the older pile only takes me a few minutes. There’s about 10-15 polishes in the older set that I use very often (NARS Purple Rain, OPI on Collins Ave.) so they went over to the new polish pile. In short, if it’s in the older polish pile, chances are very high that it’s going away.

The new polish pile takes me a long time to go through. Even though I’ve been trying to cut back on dupes, I still end up with a bunch. I then have to stop what I’m doing, do some swatches, and determine which polish I want to keep. After that’s done I go through more of the newer polishes and think about if I really want to keep them. My mom had gotten me a bunch of the polishes from OPI’s Spider Man collection last year that I haven’t worn yet because the colors really aren’t me. I decided to go ahead and keep them but I’m not sure if they’ll make the next polish cut. The old polish pile probably took me ten minutes to go through. The new polish pile took me over an hour of swatching and some rather deep thinking about polish that I’m a bit ashamed to admit to.

I will go anywhere without wearing a bit of makeup, but I hate not having my nails painted.

When I had gone through all the polishes, I organized the smaller polish bottles in a box I found lying around and put the polishes back in their bin. All neat and clean!

clean

If you’re planning to clean out your polishes, here are a few tips:

  • Separated polish is usually still good, it just needs a good shaking & rolling between your palms.
    If it doesn’t mix back together in a few minutes it’s gone bad.
  • If a polish to be thicker or thinner than you remember it may be going bad.
  • If a polish’s smell has changed, it’s gone bad.
  • Store polish upright, ignore what you see on Pinterest.
  • If you’re afraid to throw a polish out, hide it in your closet or dresser for a few months. If you haven’t gone looking for it, get rid of it.
  • Polish is best kept away from heat and sunlight. Keep it out of your bathroom!
  • Shake your polishes every so often. I’ll shake my bottles as I’m trying to decide on a color.

LovePolish

I Got My Eyebrows Threaded and Love It

EyebrowsApologies for the bad selfies.

I have a love/hate relationship with my eyebrows. I love that they’re prominent, but I don’t the love the fact that they’re pretty high maintainance. Typically, I wax them about once a month and do some upkeep with an eyebrow razor and a pair of tweezers. Since my dad blessed me with his caveman eyebrows (see left pic–monobrow ahoy), I probably should have them waxed twice a month. However, I’m cheap and short on time, so I’ve just been doing them at home.

I’ve read in the past about how amazing eyebrow threading was and when Miracle Eyebrows opened up in the Charleston Town Center I finally decided it was time to experience threading for myself.

It doesn’t take a genius to realize that eyebrow waxing hurts. For me, the pain from waxing was tolerable, it was the fact I’d been getting burned from too hot wax, or having wax-related breakouts. With threading, I’d read that some people says it doesn’t hurt while others said it was more painful than waxing and tweezing put together.  I decided it probably wouldn’t hurt anymore than waxing, so I went last Friday to have my eyebrows threaded.

It took less than ten minutes to have my brows done, and I’m ridiculously happy with the results, as you can see on the right. I didn’t get a chance to tell the woman how I wanted my brows done, but she got them precisely how I wanted them shaped.

Okay, now about the pain: It did hurt, but no more than waxing. The part that really hurt was when she was shaping the arch underneath my brow bone. It also hurt worse on the left brow as compared to the right brow. Surprisingly, the bit between my eyebrows and the tops of the brows really didn’t hurt at all. It felt weird but it was fairly painless. The best way I can describe the pain is it’s like having five hairs plucked at the same time by five tweezers.

The aftermath of threading is much better than waxing. Waxing will leave the skin red and raw feeling. There was a bit of redness with threading but it appeared to disappear before I left the salon. I also haven’t had any breakouts, no worries about burns, and no dealing with getting wax out of my eyebrows afterwards.

The cost is also nice: $12, as compared to the $20-ish to have waxing done elsewhere.

I’m in love with the results and I’m going to keep going back. I’m now a threading convert.

If you go:
Miracle Eyebrows is on the second level of the Charleston Town Center. It’s located across from the AT&T store and the Lee St. entrance. You don’t have to make an appointment but you may want to call ahead to see if they’re busy: 304-346-6789. I heavily advise not wearing mascara or other makeup, you’ll tear up and nobody wants racoon eyes.

The Summer of Shoes

summershoes

Somehow, I have either lost a majority of my shoes from last summer or they have gone to shoe heaven via my Bassett mix. After taking stock of what shoes I have left, I put together this list of the shoes I’m really loving for the summer of 2013:

Navajo Sandal | These are the classic Jack Rogers Navajos that have been worn for decades. If I buy only one pair of shoes this summer it’ll be these. I’m not sure what color to get, I’m leaning between the gold or platinum.

Espadrille Lace-Ups | I bought these the other weekend from Old Navy. They’re only $20! They’re comfortable and because they’re espadrilles I doubt they’ll last the rest of the summer. But for a pretty cheap price you get a lot of style.

Kilty Moccasin | I love moccasins, they’re just so easy to put on and go while giving an extra bit of style that flats can’t match. I’m debating between the classic brown or the gray.

Good as Gold Wedges| I bought these during the Lilly Pulitzer sale back in January. These low wedges just dress up an outfit effortlessly and I’ve been wearing them non-stop since May. The thong part that goes in between the toes was uncomfortable at first, but my mom found me some padded cushions to go around the thong part and they feel a lot better. Price have you down? They’re easy to find for around $80 unused on Ebay.

Felucca Lace | I’ve been looking for a new pair of boat shoes that have a low vamp to wear with skinny jeans/pants. These fit the bill and they’re made in America. I also love these Audrey flats from Sperry.

Hadley Espadrilles | Espadrille flats are hot this summer. All sorts of colors and prints are available on store shelves and you really just can’t go wrong with any of ’em. I fell in love with the orange detailing on this pair from a collaboration between Sperry and one of the Queens of Prep, Milly. Isn’t the bow on the back darling?

Alicia High Heel Sandal | Just a simple pair of strappy brown heels. I was going to get these, but ended up getting these from American Eagle:

AEsandals
They’re cute, they’re comfortable, they’re cheaply made. I doubt these will last much longer. I’m going to wait a bit longer to see if the Lands’ End version will go on sale a bit more before I buy. In the meantime, the AE version will suffice.

Sutton Wedges | I love the mixture of color and texture on these. I think these would be great to add interest to a rather simple outfit.

Peep Toe Cork Platform | After a knee injury about a year ago, I’ve had to nix wearing heels. Now that my knee is better I keep drooling over the highest heels I can find. I simply adore the shape on these Zara heels. Simple black peep-toes with a cork platform to help keep them summery is what made them jump over all other heels to make my list. Want to avoid knee injuries? Don’t attempt to play hockey drunk.

BGP: Maybelline Dream Bouncy Blush

BOUNCYBLUSHMaybelline Dream Bouncy Blush, $7

I read a variety of beauty blogs. Some cover only nail polish or lipstick, others will have a pretty broad scope. When both the narrow and broad focus blogs write glowingly about something I figure it’s worth investigating, especially if it’s under $10.

Maybelline gives its products the stupidest names. The Falsies. Angel Wings. Cat Eyes. However this blush is sorta bouncy so I guess the name isn’t too horrible.  To give you an idea of why they call it bouncy, it’s like touching a marshmallow. Maybelline considers this a creme blush although the texture is closer to that of a powdery light mousse.

I picked up the coral shade, although Pink Frosting seems to be the shade a lot of other beauty bloggers are picking up. I really like this blush. It gives a dewy, fresh, natural look that lasts all day long. One of my coworkers told me that it gives me a “glow,” which is unusual because she told me that before I was caffeinated.  I also layered some bronzer over it and was really happy with the results. I do recommend putting the bronzer after the bouncy blush. When you apply the blush before the bronzer your fingers life the bronzer off.  My only concern with this blush is getting the application right. I can’t seem to get it how I like my blush applied. If I put it on like I would a powder blush or my other creme blush, I look like a clown. If I try to avoid the clown look, I get that awful racing stripes effect. I’m going to continue to play around with my application techniques, I think it’s just going to be one of those products where you have to develop a new method for application.  I’m leaning towards looking for a creme blush brush, there are several types which come in different shapes. Don’t let my application issues scare you, we all wear blush differently.  The name may be silly and the compact not look like much, but this little blush gives you a knock-out look.

BGP: Laura Mercier’s Flawless Face Kit

lauramercier

Laura Mercier Oil-Free Flawless Face Kit, Sephora, $65

I keep a running list in my head of makeup that I want to try but just never get to it for one reason or another. Typically I’ll walk into Sephora, list in hand, only to pick up something shiny that caught my eye and curse myself when I get home because I didn’t get a thing off my list. The Clarisonic was on this list, and currently the list includes a creme blush brush, the Aqualillies for Tarte palette, and some Stila Smudge Pots.

(Although before I buy anything else I need to do a massive purge of my makeup.)

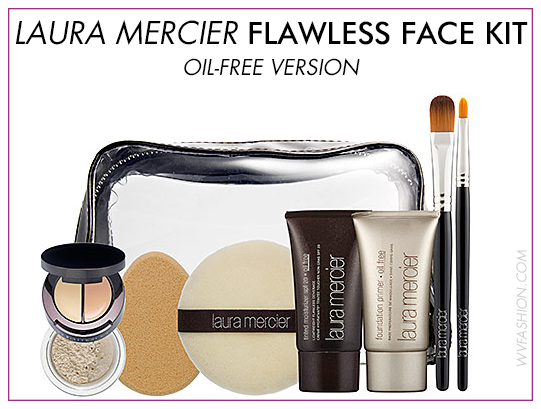
This Laura Mercier kit has been on my waiting list for probably about two years. I finally broke down and bought it during Sephora’s Chic Week, where the VIBs get I think it was like 15-20% off their purchases during the week. The main reason I bought this kit was for the concealer brushes, which you’ll see on the right hand side of the graphic above. The brushes were almost $28 apiece, so buying the kit just made much more sense. I’ve used the Laura Mercier setting powder in the past and it was okay, but I was eager to try everything else.

First, the good:
There are two brushes in the kit, a pointy brush and a flat, rounded brush. Both are concealer brushes but they have different purposes. I have heard the pointy brush called “a laser guided” aid in applying concealer to a pimple. The statement may sem laughable but it’s true. This brush is five types of amazing. The pointy-ness allows to take just the right amount of the concealer and places it on the head of the pimple. Either tap or blend it very lightly with the brush, set it with the powder, and the pimple is gone. Because I’ve seen and tried so many different formulas, brushes, methods, etc., to conceal, it’s hard to impress me. This combo of the brush and concealer is impressive.

The second rounded flat brush is for use with the other side of the concealer for under your eyes. It seems to have yellow-ish undertones which worried me at first, but once I got it applied it’s truly spectacular. Again, I’ve seen and done a lot to get undereye circles gone, and this worked perfectly. Both this brush and the pointy one are full-sized, and mixed in with the concealer (which is half-sized) I consider my $65 well-spent.

The okay:
I’ve used Laura Mercier’s setting powder before, and at the time I liked it. Now, after using Tarte’s Amazonian Clay setting powder for so long, I really don’t think it’s as good as I thought it was. In a pinch, it’ll do, but I’ll continue to use my Tarte. The sponges included in the kit for applying the tinted moisturizer and the puff for the powder are both good quality, and I threw them in my travel kit so I don’t have to haul my foundation brush with me all the time.

The bad:I haven’t used Laura’s primer or tinted moisturizer before but have heard a lot of good things about them so I was more than willing to give them a try. Well, what was should I say interesting was watching my makeup melt right off my face despite the primer. I could see where my blush was migrating down my cheeks. I’ve never seen anything like it. I stepped outside on one of the hotter days in downtown Charleston, and I could see where a bead of sweat was moving down my face, covered in makeup. I tried the tinted moisturizer without the primer, but it didn’t seem to last that long. I didn’t see any residue when I washed my face that night on my Clarisonic.

Despite the fact I didn’t like the primer or moisturizer, the kit is a good buy. The brushes alone are worth their weight in gold, and the concealer impressed me, tryer of all things concealing.

REVIEW: Revlon Lash Potion Mascara

mascara

Revlon Lash Potion Mascara, $5-7

I’ll admit it, I’m a sucker for a pretty package. I’m in the market for a new mascara and one just happens to come along in such a pretty coat, yeah, I’m going to buy it.

I have–and will always–declare Tarte’s Lights! Camera! Lashes! to be the best mascara available on the market. However, at $19 a tube, it can get pricey. Especially if you’re like me and keep forgetting to close the tube all the way. Oops.

In the past I’ve used Maybelline’s classic Great Lash mascara in the famous pink and green tube. It gives a lot of a volume but I wanted something that would give length as well. I’ve also tried Cover Girl’s Lash Blast Fusion with bad results, and L’Oreal’s Telescopic which is the wand with the little ball on the end. I like it but I can’t put it on in a rush, which is how I usually do my makeup.

Henceforth, the mascara in the sparkly rainbow tube made its way into my makeup bag after my last Walmart trip. I accidentialy picked up the waterproof version, which actually ended up being a good thing because when I rubbed my eyes it didn’t smear all over the place.

This is what Revlon has to say about Lash Potion:

Magically transform lashes to lush, long and lustrous. A potion with strengthening proteins drenches lashes for volume. Triple-groove wand combs through for clump-free length.

The brush consists of traditional nylon bristles set into a pattern I can best describe as similar to the Mercedes-Benz logo.


mercedes-benz-logo-design
The mascara doesn’t have much of a scent, other than the usual sort of earth-y scent that most mascaras have. I found the formula was rather wet but dried quickly. The brush head is somewhat large for a mascara wand which made getting to the inner corners of my eyes tricky.

Lash Potion gave my lashes some amazing length, probably the longest I’ve seen. That, and the anti-smudge of the waterproof are the best qualities of this mascara. The first coat I put on just lengthed my lashes. The second coat added a bit more volume and some clump. The third coat was pure clump. This mascara gave me the worst case of tarantula eyes.

If you like to layer your mascara, then I’d highly recommend this mascara. It does give great length and the waterproof version doesn’t budge. However, if you’re like me and apply your mascara while driving down I-64 on your way into work, I’d skip it.


tl; dr: A high-maintence mascara that is good for length and nothing more.

Battle of the Face Brushes: Clarisonic vs. Olay Pro-X

thing

Clarisonic $119 + 20% off  | Olay Pro-X, $25

I’ve had the Olay Pro-X face brush for going on two and a half years. I’d typically use it 3-4 times a week when my skin felt disgusting or I wanted to a bit of a deeper clean than just face wash alone. I had wanted the Clarisonic for years but was hesitant to pay the price for one when numerous blogs said that the two were pretty close.

Earlier this year I found a Clarisonic on Sephora’s clearance shelf and broke down and got it. You can read my story on that experience here.

I’ve been using the Clarisonic for a little over a month now, and it’s fantastic. It’s amazing. I wish I had bought it sooner.

The Olay Pro-X has a head that rotates quickly and has a hint of vibration. It has two speeds.
The Clarisonic head doesn’t move, but the unit vibrates with sonic waves. You rotate the brush manually to get the exfoliating action. My model, the Plus, has three speeds and a timer for the recommended 20 seconds each on nose, chin, and forehead, and 10 seconds each for the cheeks. I think the timer is pretty pointless.

The results I have gotten from the Clarisonic in the past month have been amazing. It’s been really helpful on helping to shrink the appearance of my pores and keeping my oily skin in check. I don’t have to use as much skin care products, which I hope will save me some coin in the long run. A lot of people have said it also helps with aging and wrinkles but since I don’t have either of those I can’t say.

Even if you can’t afford the Clarisonic, the Olay Pro-X is a solid must-have for your bathroom. It does help with exfoliation and makeup removal.

Either way, you can’t go wrong. However, if you’re in serious need of some skin help, the Clarisonic is the way to go.

Save Money on Pedicures with this Lotion!

pumice

I’ve been meaning to get a pedicure for the last month, but I haven’t gotten around to finding a new nail tech in Charleston. I usually do them myself, but when I was working at the airport the steel-toe shoes I had to wear destroyed my feet.

Now it’s sandal time and my feet look horrible. I was at Sally’s Beauty Supply the other day and I saw this lotion, Mr. Pumice Callus Terminator. It claims to get rid of calluses in minutes. So I bought it and a pumice bar and gave it a try. I soaked my feet for about 10 minutes, then applied the lotion for another five minutes then scrubbed like hell with the pumice stone. My feet look amazing, they’re soft, and I can’t be more thrilled.

I have to warn you though, this product contains lye,  which is a very caustic cleanser. The directions say to wear gloves when applying the lotion or to rinse your hands immediately. The lotion doesn’t come off easily. No matter how much I scrubbed it refused to budge. I probably have the top two layers of the skin on my hands flaking off right now and it’s pretty gross. So, wear gloves and you’ll be golden.

If you’re like me and keep forgetting to get a pedicure or you’re cheap, $12 at Sally’s Beauty Supply will have your feet looking like new.

A Dress For All Occasions

From 2008-2012 I worked in various aspects of the construction industry. This meant a lot of jeans, company polos, and Carhartt.
Then I had the world’s most unflattering uniform in the airline industry. Lots of baggy navy blue.
And now I’m an office manager.

This means an entire shift in my wardrobe. Still overrun with denim and faded tees, I have pretty much been wearing the same thing to work everyday: my navy pants from my airline uniform (a tad frumpy but OH SO COMFY) and a cardigan.

My mom even told me it was time I spent some money putting together a work wardrobe.

purpledress

Sideswept jersey dress | Coldwater Creek $99-109 + 25% off

This dress comes in sizes 4-24, not to mention petites sizing. I pretty much love everything about this dress:
-Flattering draping across the bodice
-A color that goes with so much. Need to add a blazer? Black, red, brown, white, etc. would look great.
-So easy to accessorize!
-Made of jersey material, meaning no wrinkling, making this a good dress for business travel or to keep on hand just in case.

This dress just has a lot going for it. I’m finding out that work dresses in general are fairly expensive and that I can’t live in Old Navy as much as I’m used to. Yes, I can pick up a jersey dress from ON, but it’s going to be a thin jersey, as opposed to the thickness of the Coldwater Creek jersey. Not all jersey dresses are equal.

With this dress I could wear any number of my usual cardigans, purses, or shoes. I can’t say that about a lot of the work dresses I’ve looked it.